Serving LLMs on Kubernetes: A Beginner's Guide to vLLM, KServe and GPU Scheduling
If you already know how to deploy a web service on Kubernetes, serving a large language model looks like it should be the same job with a bigger container. It isn't quite. In this guide you will learn why LLM serving is different, what the three layers of a typical stack (GPU scheduling, vLLM and KServe) each do, and how to get a model answering requests twice: first with a plain Deployment, then through a KServe InferenceService. Along the way you will get working manifests, a test request and a list of the problems beginners hit most often.
Why serving an LLM is not like serving a web app
A typical web app is limited by CPU and starts in seconds. An LLM server is limited by GPU memory, and two things fill that memory: the model weights and the KV cache. The weights are easy to estimate: multiply the parameter count by the bytes per parameter. A 7B model stored in FP16 or BF16 uses two bytes per parameter, so the weights alone take about 14 GB.
The KV cache is the tricky part. For every token of every active request, the model keeps attention keys and values so it does not recompute them. The per-token cost is roughly 2 × layers × (heads × head dimension) × bytes per value, and the total grows linearly with sequence length and batch size. Here is a quick worked example. Llama 2 7B has 32 layers and 32 heads of dimension 128, so in FP16 each token costs 2 × 32 × 4096 × 2 bytes, about 0.5 MB. A single 4,096-token conversation therefore needs about 2 GB of KV cache on top of the 14 GB of weights. Ten such conversations at once would need another 20 GB. In other words, memory use moves with traffic, not just with the model you chose.
Startup is slow too. Most of the time before an inference pod is ready goes into pulling a large container image and downloading and loading the weights, which means minutes rather than seconds. Finally, answers stream out token by token. Users feel the time to first token (TTFT), which grows with prompt length and queueing, and the end-to-end latency, which is TTFT plus the time to generate the rest of the output. All of this changes how you size, probe and scale the workload.
The big picture: three layers that work together
It helps to picture the stack as three layers before diving into each one.
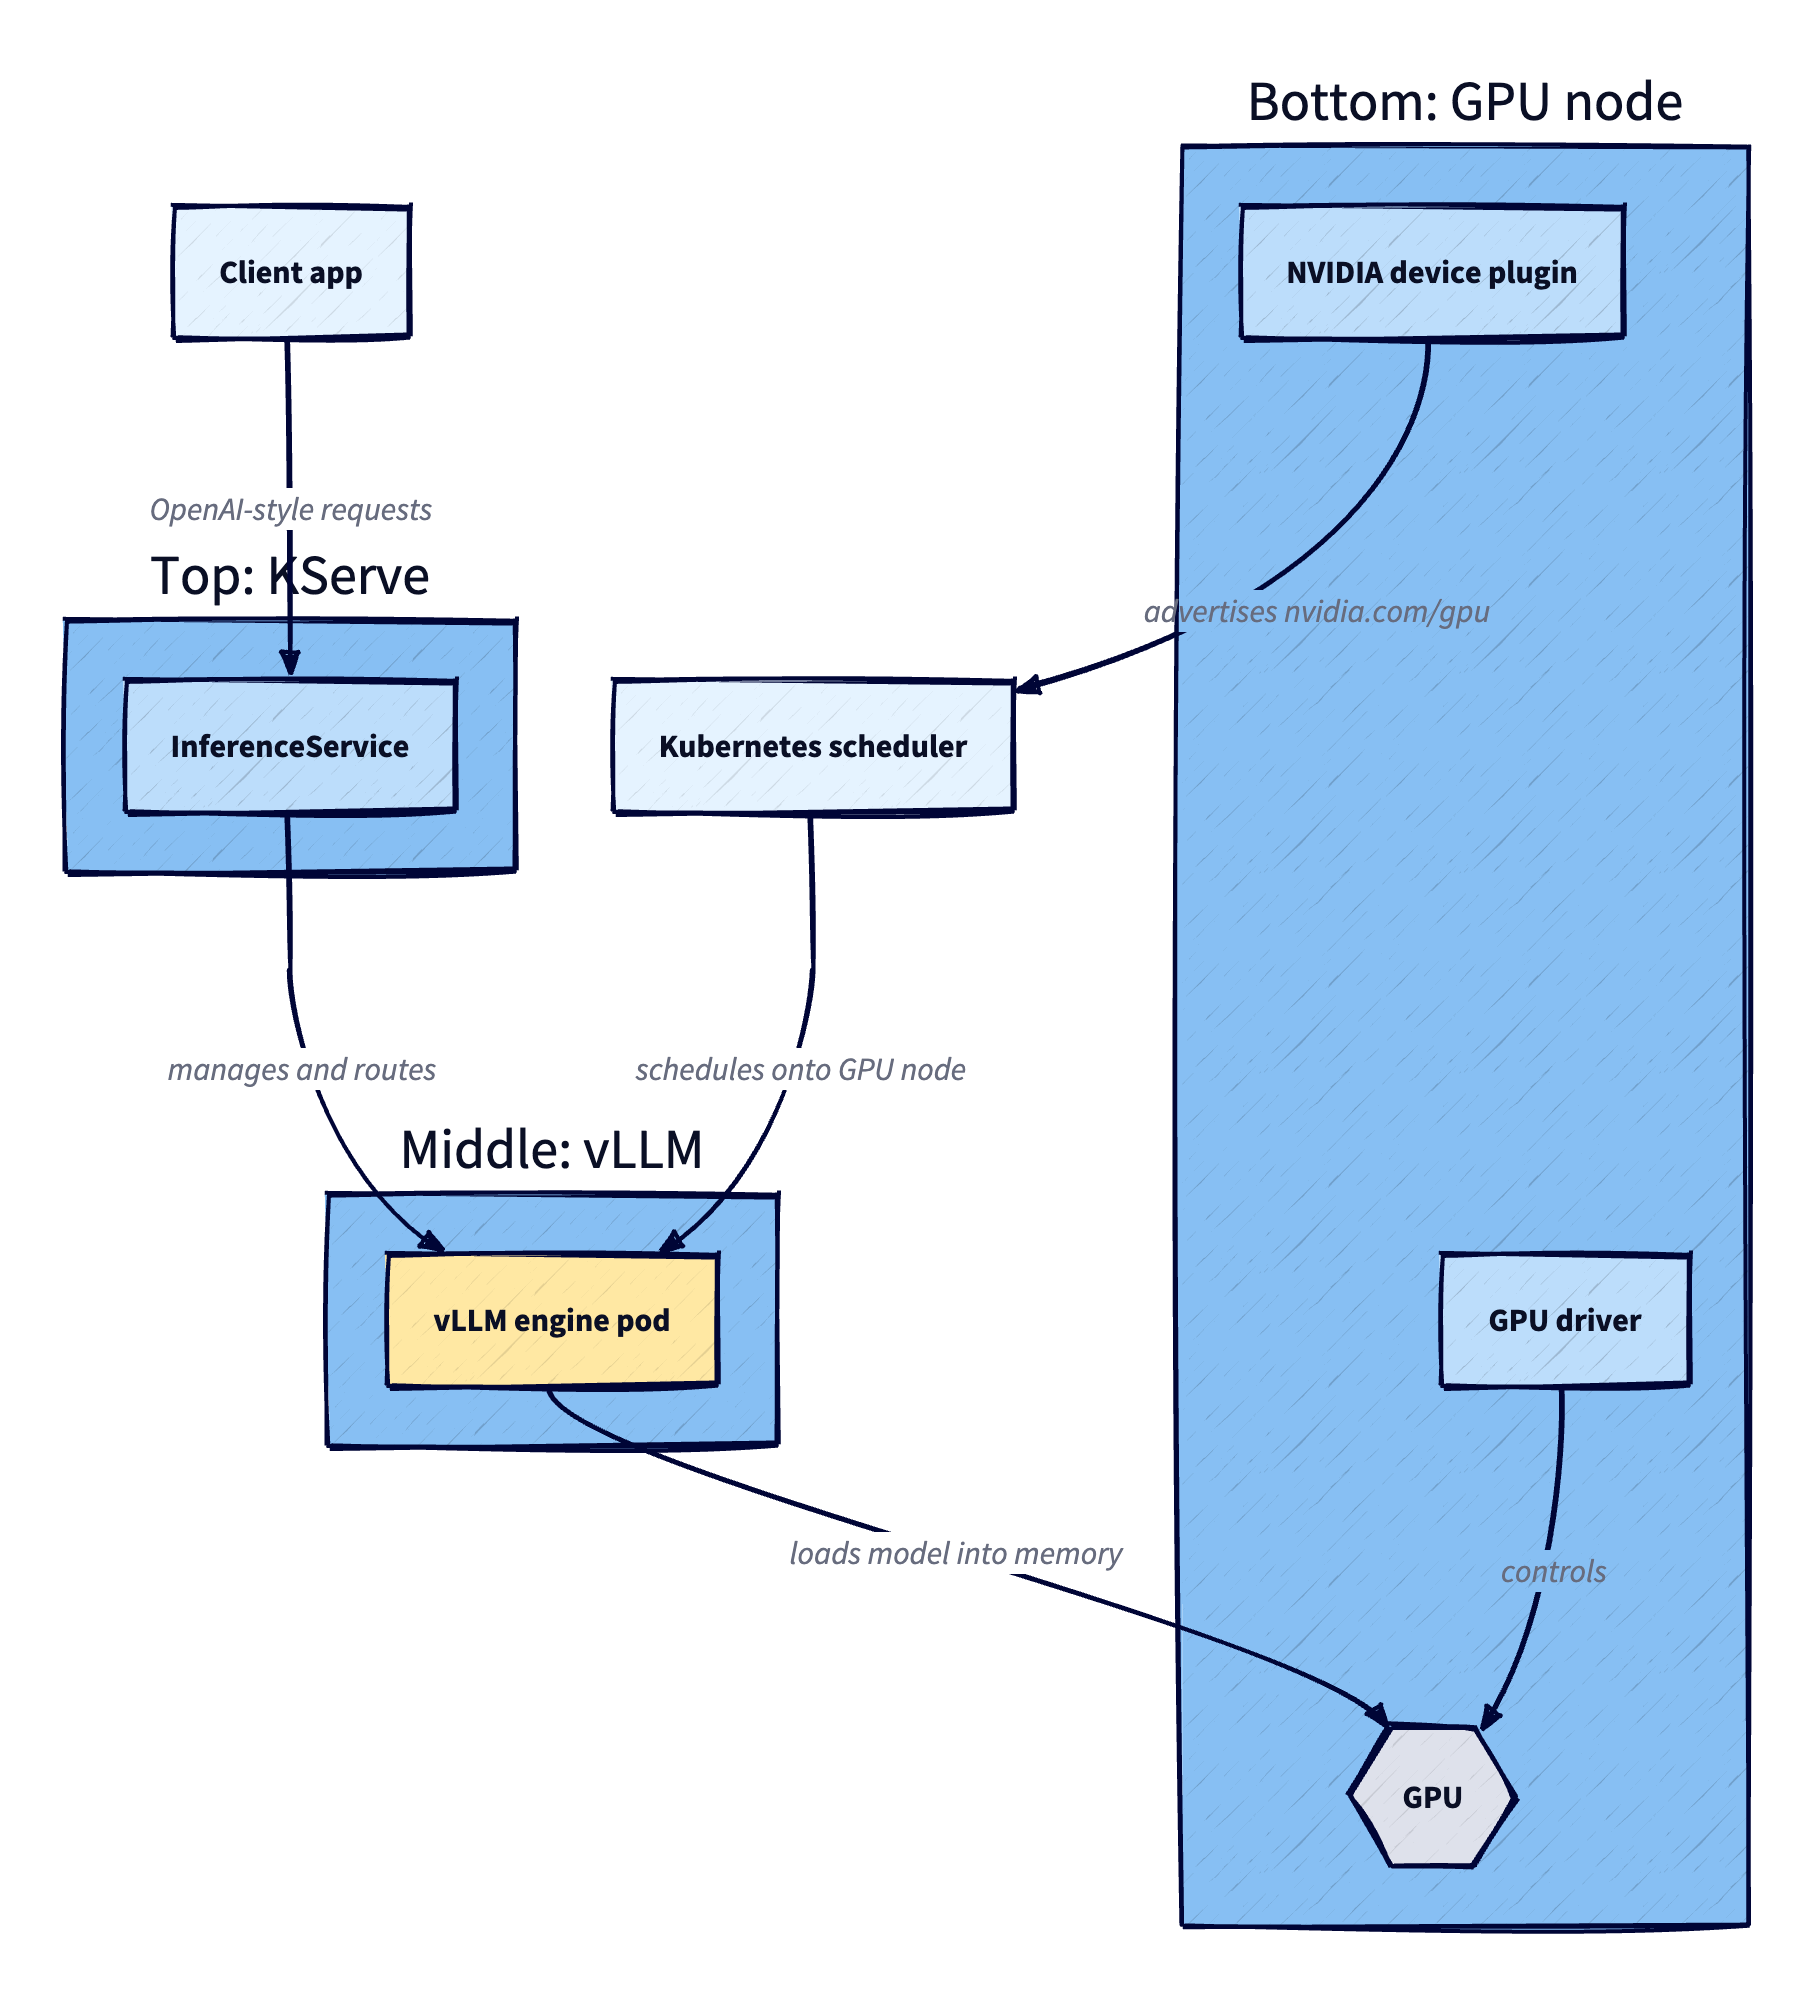
At the bottom, the GPU driver and a device plugin let Kubernetes see GPUs and schedule pods onto them. In the middle, vLLM is the inference engine: it loads the model into GPU memory and answers OpenAI-style HTTP requests. On top, KServe wraps the engine in an InferenceService resource that handles model storage, scaling and rollouts. Each layer depends on the one below it, but KServe is optional: clients only go through it when you use it. In Step 1 they reach vLLM directly through a plain Kubernetes Service, with no KServe involved; only in Step 2 do requests arrive through the endpoint KServe creates for the InferenceService. The tutorial follows that order: make sure GPUs are schedulable, deploy vLLM directly, then deploy the same model through KServe.
vLLM: the inference engine
vLLM is an open-source inference and serving library that started at UC Berkeley. Its authors noticed that serving throughput was mostly limited by how much GPU memory the KV cache consumed, and that earlier systems wasted roughly 60 to 80 percent of that memory through fragmentation and over-reservation. Their fix, PagedAttention, borrows the idea of virtual-memory paging from operating systems. Each request's KV cache is split into small fixed-size blocks that do not have to sit next to each other in memory, and blocks are allocated only as new tokens arrive, so waste is limited to the last, partly filled block. Less waste means more requests fit on the GPU at once.
The second trick is continuous batching. Instead of waiting for a whole batch of requests to finish, the scheduler lets new requests join the running batch as soon as others complete, which keeps the GPU busy. The current V1 engine gives every request a token budget and treats prompt and output tokens alike, so it can mix prefill and decode work in one batch; it also turns optimisations such as chunked prefill on by default, and the older V0 engine is now fully deprecated.
For you as an operator, the most useful part is the server. Running vllm serve <model> starts an HTTP server that implements OpenAI's Completions and Chat Completions APIs, listening on port 8000 by default. It serves one model at a time and offers /v1/models, /v1/completions and /v1/chat/completions. One catch: chat requests only work if the model's tokenizer ships a chat template, or if you pass one with --chat-template.
How Kubernetes schedules GPUs
Out of the box, Kubernetes knows nothing about GPUs. An administrator has to install the vendor driver on each GPU node and run the vendor's device plugin; once the plugin is running, the node advertises an extended resource such as nvidia.com/gpu that pods can request just like CPU or memory.
On your own clusters, the easiest route is the NVIDIA GPU Operator. Installed with Helm, it runs the driver, the NVIDIA Container Toolkit, the device plugin, the DCGM Exporter for metrics and the MIG Manager on every GPU node, and it deploys Node Feature Discovery if it is not already there. Managed clouds handle this differently. GKE can install the driver for you and then advertises GPU capacity through its own device plugin. On EKS, the Bottlerocket accelerated image ships with both the driver and the device plugin. On AKS, a GPU node pool gets only the driver by default, so nothing advertises nvidia.com/gpu yet. You either create the pool with --enable-managed-gpu=true, which makes AKS install and maintain the driver, device plugin and DCGM metrics exporter, or deploy the device plugin yourself, for example with the GPU Operator.
When you request GPUs, they belong in limits. Kubernetes uses the limit as the request, and if you set a request it must equal the limit. To steer a pod to a particular GPU type, label the nodes and use a nodeSelector or node affinity. To keep ordinary workloads off expensive GPU nodes, taint those nodes and add a matching toleration to your GPU pods; GKE, for example, taints GPU nodes with nvidia.com/gpu=present:NoSchedule and adds the toleration to GPU pods automatically. A minimal pod spec that puts all of this together looks like this:
apiVersion: v1
kind: Pod
metadata:
  name: gpu-check
spec:
  restartPolicy: Never
  nodeSelector:
    nvidia.com/gpu.product: NVIDIA-L4
  tolerations:
    - key: nvidia.com/gpu
      operator: Exists
      effect: NoSchedule
  containers:
    - name: cuda
      image: nvidia/cuda:12.4.1-base-ubuntu22.04
      command: ["nvidia-smi"]
      resources:
        limits:
          nvidia.com/gpu: 1
The nvidia.com/gpu.product label is one that the GPU Operator's feature discovery adds; check kubectl get nodes --show-labels for the exact value on your nodes. By default one pod gets a whole GPU. If that is wasteful, time-slicing advertises several replicas of one GPU so pods can share it, though without memory or fault isolation, while MIG splits newer GPUs into fixed instances that are isolated in hardware.
Step 1: Deploy vLLM with a plain Deployment and Service
Now for the first working example. The manifest below runs the vllm/vllm-openai image on one GPU, caches weights on a PersistentVolumeClaim and puts a ClusterIP Service in front, following the pattern in the vLLM Kubernetes guide. It serves Llama 3 8B Instruct, the same model KServe's own text-generation example uses, so you can deploy it again in Step 2 and compare like with like. At two bytes per parameter its weights take about 16 GB, so pick a GPU with 24 GB or more. Llama 3 is a gated model: accept its licence on its Hugging Face page first, then store your access token in a Secret and inject it as HF_TOKEN.
apiVersion: v1
kind: Secret
metadata:
  name: hf-secret
type: Opaque
stringData:
  HF_TOKEN: replace-with-your-token
---
apiVersion: v1
kind: PersistentVolumeClaim
metadata:
  name: vllm-cache
spec:
  accessModes: ["ReadWriteOnce"]
  resources:
    requests:
      storage: 50Gi
---
apiVersion: apps/v1
kind: Deployment
metadata:
  name: vllm-server
spec:
  replicas: 1
  selector:
    matchLabels:
      app: vllm-server
  template:
    metadata:
      labels:
        app: vllm-server
    spec:
      tolerations:
        - key: nvidia.com/gpu
          operator: Exists
          effect: NoSchedule
      volumes:
        - name: cache
          persistentVolumeClaim:
            claimName: vllm-cache
        - name: shm
          emptyDir:
            medium: Memory
            sizeLimit: 2Gi
      containers:
        - name: vllm
          image: vllm/vllm-openai:latest
          command: ["/bin/sh", "-c"]
          args:
            - vllm serve meta-llama/Meta-Llama-3-8B-Instruct --max-model-len 8192
          env:
            - name: HF_TOKEN
              valueFrom:
                secretKeyRef:
                  name: hf-secret
                  key: HF_TOKEN
          ports:
            - containerPort: 8000
          resources:
            requests:
              cpu: "4"
              memory: 16Gi
              nvidia.com/gpu: 1
            limits:
              cpu: "8"
              memory: 24Gi
              nvidia.com/gpu: 1
          volumeMounts:
            - name: cache
              mountPath: /root/.cache/huggingface
            - name: shm
              mountPath: /dev/shm
          startupProbe:
            httpGet:
              path: /health
              port: 8000
            periodSeconds: 10
            failureThreshold: 60
          readinessProbe:
            httpGet:
              path: /health
              port: 8000
            periodSeconds: 5
          livenessProbe:
            httpGet:
              path: /health
              port: 8000
            periodSeconds: 10
---
apiVersion: v1
kind: Service
metadata:
  name: vllm-server
spec:
  type: ClusterIP
  selector:
    app: vllm-server
  ports:
    - port: 8000
      targetPort: 8000
The :latest image tag is fine for a first try, but a real deployment should pin a specific vllm/vllm-openai release tag, so that a pod restart never silently pulls a new vLLM version and upgrades happen only when you choose them.
A few other choices deserve a word. The PVC mounted at /root/.cache/huggingface means a restarted pod finds the weights already on disk instead of downloading them again, and the memory-backed /dev/shm volume gives vLLM the shared memory it needs for tensor-parallel inference. The probes matter even more. A failing liveness probe makes the kubelet kill the container, and liveness checks only start once the startup probe has succeeded. The startup allowance is failureThreshold × periodSeconds, so 60 × 10 seconds gives the model ten minutes to download and load. Until the readiness probe passes, the Service sends the pod no traffic. Put your real token in the Secret, apply the file with kubectl apply -f vllm.yaml and follow progress with kubectl logs -f deploy/vllm-server.
What KServe adds on top
The hand-written Deployment works, but you own every detail: storage, probes, scaling and upgrades. KServe, a CNCF project, is a model inference platform on Kubernetes for both predictive and generative models. You describe the model in an InferenceService, and KServe creates the Deployment, Service, routing and autoscaler for you.
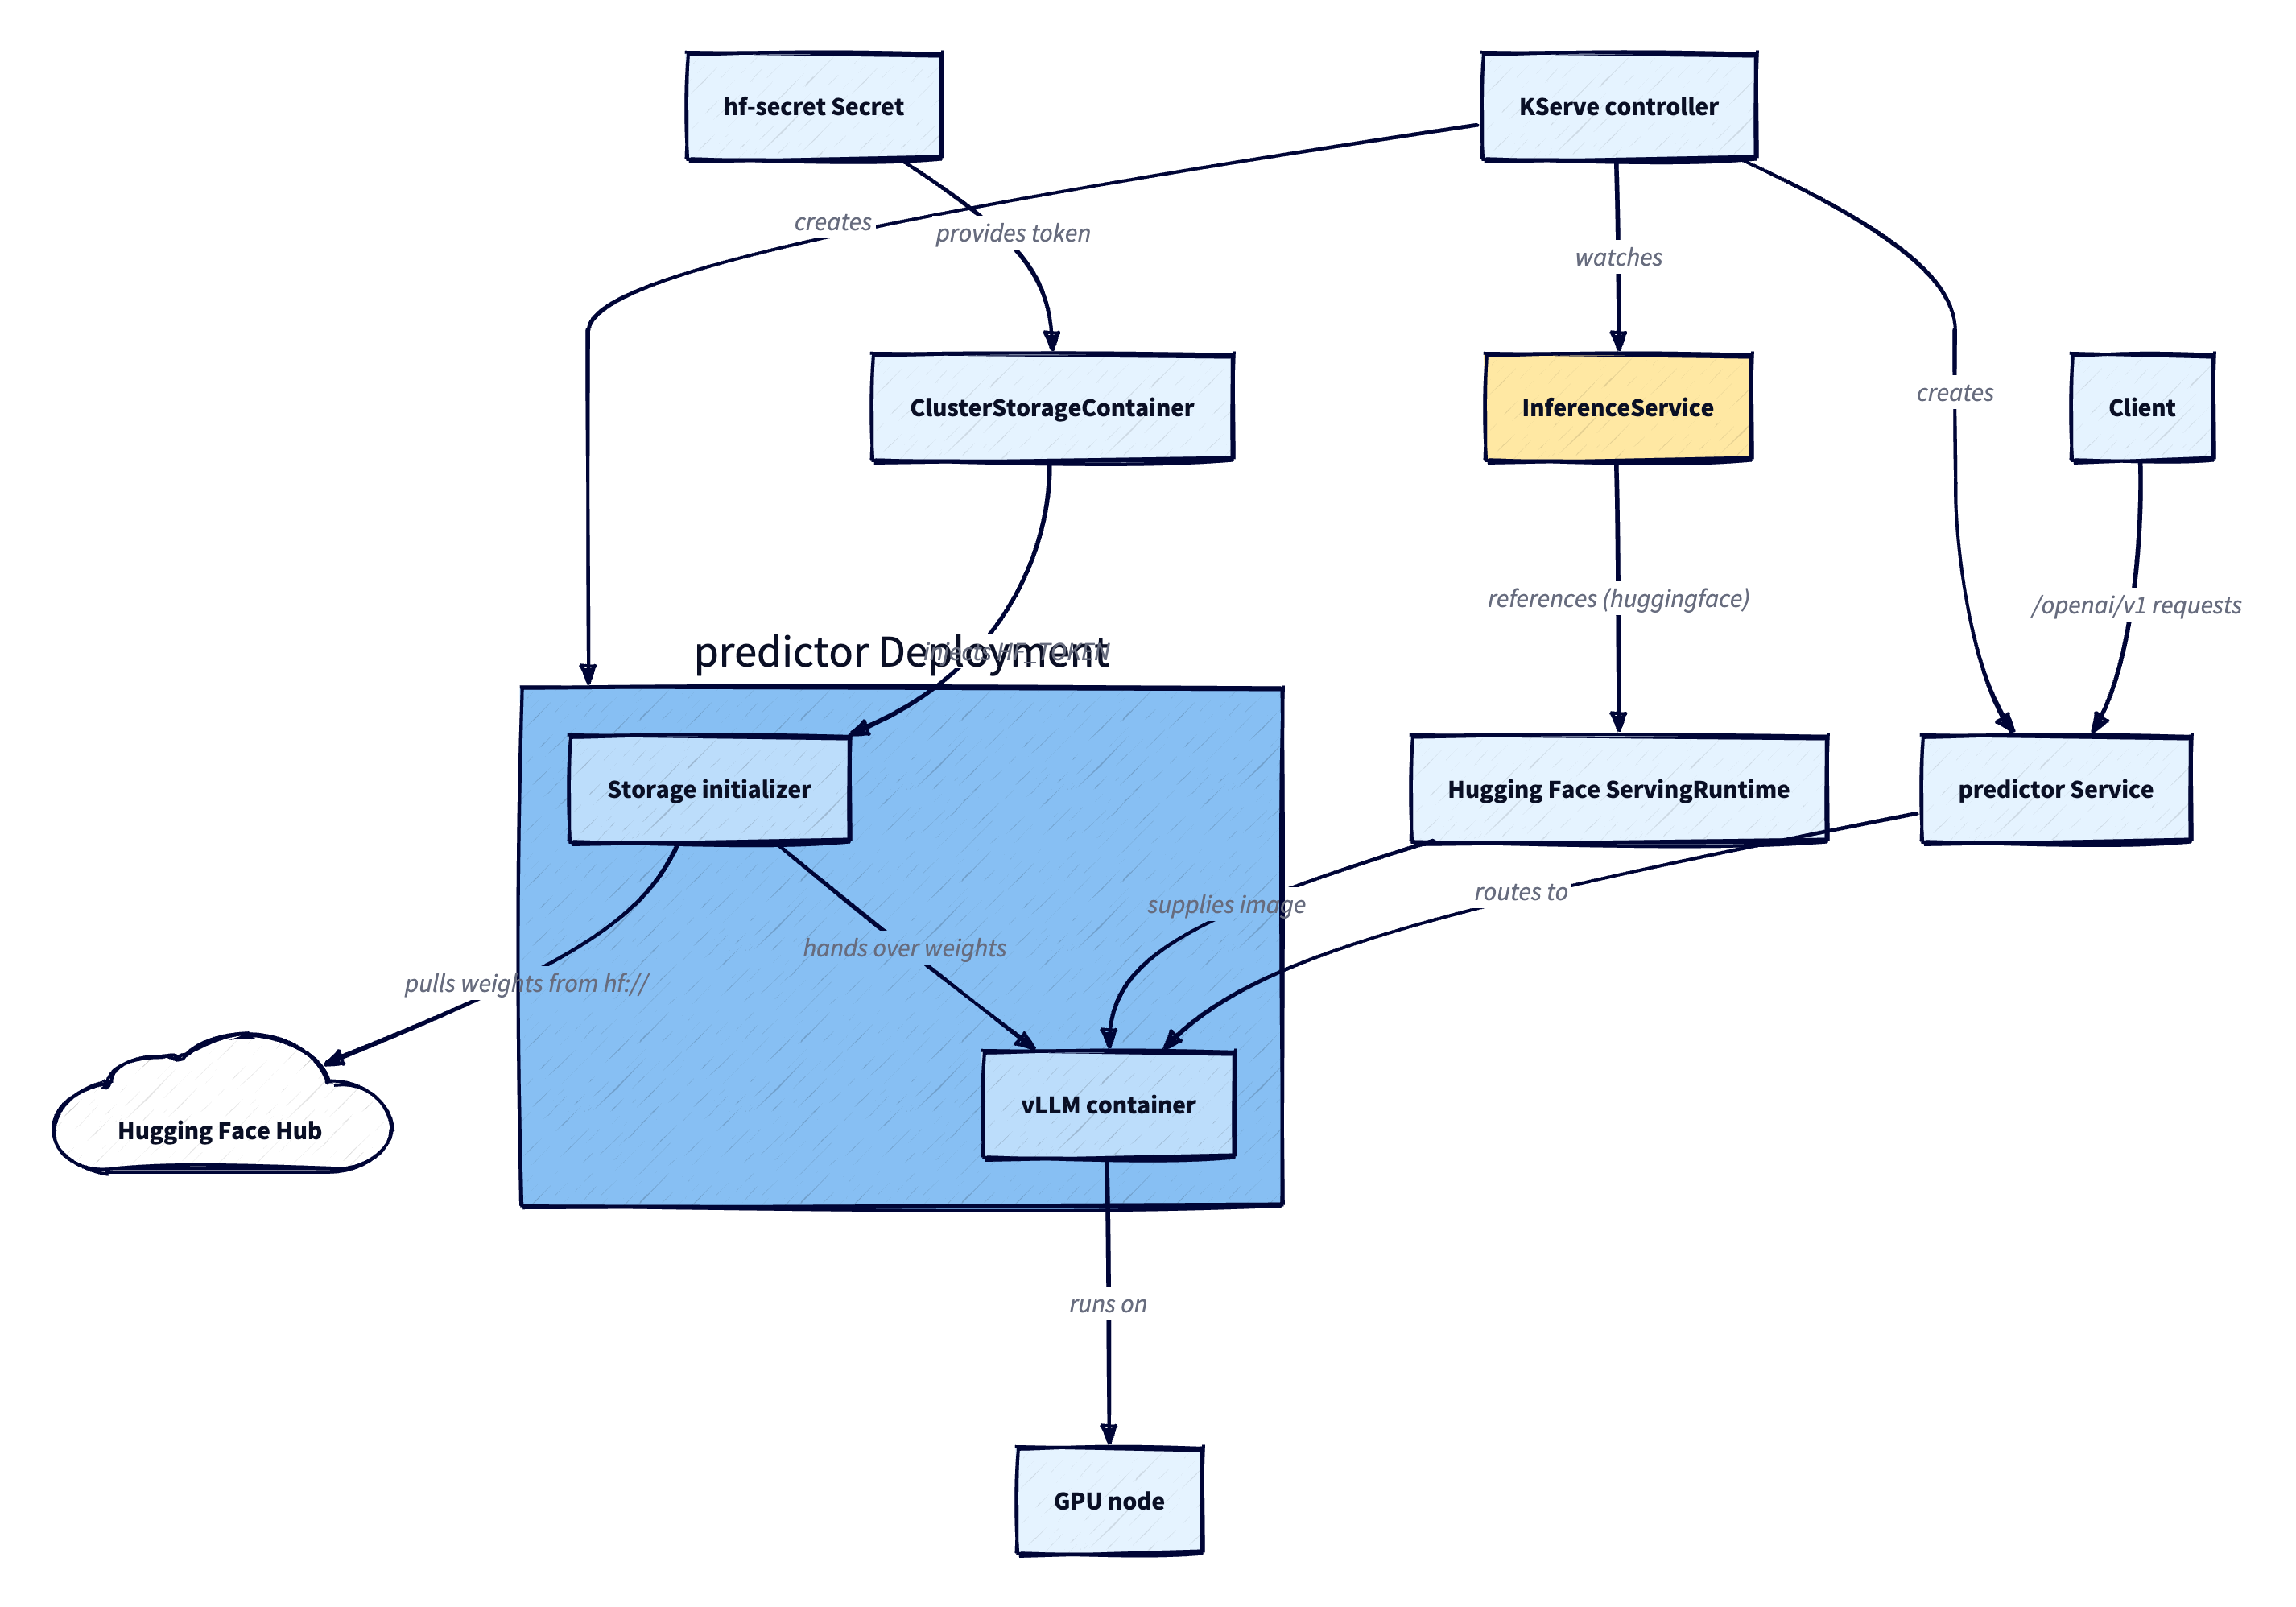
The diagram above shows how the pieces connect. Which container actually runs is decided by a serving runtime. KServe has two kinds, ServingRuntime (namespaced) and ClusterServingRuntime (cluster-wide), which differ only in scope; each is a pod template that lists the image and the model formats it supports. The Hugging Face runtime used in this guide comes preinstalled with KServe as a ClusterServingRuntime named kserve-huggingfaceserver. The controller matches your huggingface model format to that runtime, and its default and recommended backend is vLLM. Weights come from a storageUri; a storage initializer downloads them before the model server starts, and it understands hf:// URIs when you give it a Hugging Face token through a ClusterStorageContainer. The vLLM container then serves on a GPU node, and requests arrive through a Service under the /openai/v1 path prefix.
KServe can run in two modes. Standard mode (formerly called RawDeployment) uses plain Deployments, Services, routes and HPAs, and it is the recommended choice for GPU and LLM workloads because it handles GPU resources, long-running requests and streaming well. Knative mode targets scale-to-zero for bursty predictive models and needs Knative installed. In Standard mode you get HPA autoscaling, with KEDA as an option for custom metrics, although scaling up from zero on HTTP traffic is not supported. Canary rollouts, where a new model version takes a slice of traffic before it takes all of it, are available too: Standard mode gained canary rollout support in v0.20, and v0.21 builds on it by splitting the traffic with weighted Gateway API HTTPRoutes.
Step 2: Deploy the same model as a KServe InferenceService
This step assumes KServe is installed in Standard mode, which you can do with its Helm charts. You will serve the same model as in Step 1, and you will do it exactly the way KServe's own example does: the example serves Llama 3 8B Instruct, a gated model, from the URI hf://meta-llama/meta-llama-3-8b-instruct. Because KServe downloads the weights itself rather than letting vLLM do it, the token has to reach KServe's storage initializer. The pattern is a Secret holding the token under HF_TOKEN, which you already created as hf-secret in Step 1, plus a ClusterStorageContainer that hands it to the storage initializer for every hf:// URI:
apiVersion: serving.kserve.io/v1alpha1
kind: ClusterStorageContainer
metadata:
  name: hf-hub
spec:
  container:
    name: storage-initializer
    image: kserve/storage-initializer:latest
    env:
      - name: HF_TOKEN
        valueFrom:
          secretKeyRef:
            name: hf-secret
            key: HF_TOKEN
  supportedUriFormats:
    - prefix: "hf://"
As with the vLLM image, pin the storage initializer to the tag that matches your KServe release once you move beyond experiments. The InferenceService itself is short. It names the huggingface model format, gives the model a serving name with --model_name, points storageUri at the Llama 3 repository and asks for one GPU with equal requests and limits, matching the KServe example:
apiVersion: serving.kserve.io/v1beta1
kind: InferenceService
metadata:
  name: llama3-8b
spec:
  predictor:
    model:
      modelFormat:
        name: huggingface
      args:
        - --model_name=llama3
      storageUri: hf://meta-llama/meta-llama-3-8b-instruct
      resources:
        requests:
          cpu: "6"
          memory: 24Gi
          nvidia.com/gpu: "1"
        limits:
          cpu: "6"
          memory: 24Gi
          nvidia.com/gpu: "1"
Apply both files, then run kubectl get inferenceservice llama3-8b until the READY column shows True. Compare this with Step 1: the model is identical, but you wrote no Deployment, no Service, no PVC and no probes. KServe picked the kserve-huggingfaceserver runtime, generated those objects, handled the download and attached an autoscaler. You give up a little direct control in exchange for a resource that describes what you want rather than how to build it.
Step 3: Send a test request
The quickest way to reach either deployment from your laptop is kubectl port-forward, which maps a local port to a Service without exposing anything publicly; it is meant for debugging, not production traffic. For the plain vLLM deployment:
kubectl port-forward svc/vllm-server 8000:8000

# in a second terminal
curl http://localhost:8000/v1/models

curl http://localhost:8000/v1/chat/completions \
  -H "Content-Type: application/json" \
  -d '{"model": "meta-llama/Meta-Llama-3-8B-Instruct",
       "messages": [{"role": "user", "content": "Say hello in one sentence."}],
       "max_tokens": 50}'
The first call lists the loaded model, which is a fast sanity check. For KServe, the predictor Service in Standard mode is usually named after the InferenceService with a -predictor suffix (confirm with kubectl get svc). Forward to it and use the /openai prefix and the name you set with --model_name:
kubectl port-forward svc/llama3-8b-predictor 8080:80

curl http://localhost:8080/openai/v1/chat/completions \
  -H "Content-Type: application/json" \
  -d '{"model": "llama3",
       "messages": [{"role": "user", "content": "Say hello in one sentence."}],
       "max_tokens": 50}'
In a real cluster you would go through the ingress or gateway instead, passing the InferenceService hostname from .status.url in a Host header. Because both servers speak the OpenAI protocol, you can also use the official OpenAI client by changing its base URL:
from openai import OpenAI

client = OpenAI(base_url="http://localhost:8000/v1", api_key="unused")
reply = client.chat.completions.create(
    model="meta-llama/Meta-Llama-3-8B-Instruct",
    messages=[{"role": "user", "content": "Say hello in one sentence."}],
)
print(reply.choices[0].message.content)
A healthy response is a JSON object with a choices array whose first entry holds an assistant message, a finish_reason such as stop or length, and a usage block counting prompt and completion tokens. If you see that, your model is serving.
Common pitfalls and how to fix them
A pod stuck in Pending almost always means no node can offer the GPU it asked for. Either no node advertises nvidia.com/gpu because the device plugin is missing, or the nodes exist but your pod lacks the toleration or has a nodeSelector that matches nothing. On AKS, remember that a default GPU pool has no device plugin. Run kubectl describe pod and read the scheduling events; then check kubectl describe node for allocatable GPUs.
CUDA out-of-memory errors mean the weights plus KV cache do not fit. Lower the maximum context with --max-model-len or the maximum number of sequences batched together with --max-num-seqs, use a quantized model, or split the model across GPUs with --tensor-parallel-size. You can also tune --gpu-memory-utilization, the share of GPU memory vLLM reserves for weights, activations and KV cache. All four are vllm serve flags, so they go on the same command line as the model name.
Slow downloads make every restart painful. Cache weights on a PVC as in Step 1, pre-pull or stream images, and consider faster weight loaders that read straight from object storage. With a gated model such as Llama 3, a download that fails outright usually means the token is wrong or the model ID is mistyped, so check both. Pods restarting before they are ready, often with KeyboardInterrupt: terminated in the log, mean a probe gave up while the model was loading; raise the startup probe's failureThreshold. Finally, if completions work but chat requests fail, the model probably has no chat template, so supply one with --chat-template or pick an instruct model that includes one.
Key takeaways and next steps
The stack comes down to three ideas. The device plugin makes GPUs schedulable, vLLM makes inference efficient, and KServe makes it manageable. Starting with a plain Deployment teaches you what each moving part does; moving to KServe then hands storage, scaling and rollouts to a controller.
When you are ready to go further, autoscale on signals that matter for LLMs rather than CPU. For the InferenceService you just deployed, that means HPA or, for custom metrics, KEDA. KServe also has a separate resource, LLMInferenceService, meant for advanced LLM serving such as prefix-aware routing and disaggregated prefill and decode; the project advises starting with InferenceService and switching only when you need those features. Since v0.21, an LLMInferenceService can scale directly through KEDA on vLLM metrics such as the number of waiting requests, and setting idleReplicaCount to 0 gives true scale-to-zero. For model upgrades on your InferenceService, use canary traffic splitting so a new version proves itself on a slice of traffic first. And when GPUs sit half idle, share them with time-slicing or partition them with MIG, while the DCGM Exporter that the GPU Operator installs gives you the metrics to see what is really happening. Get one model answering reliably first; the rest builds on that.